Preppy plaid


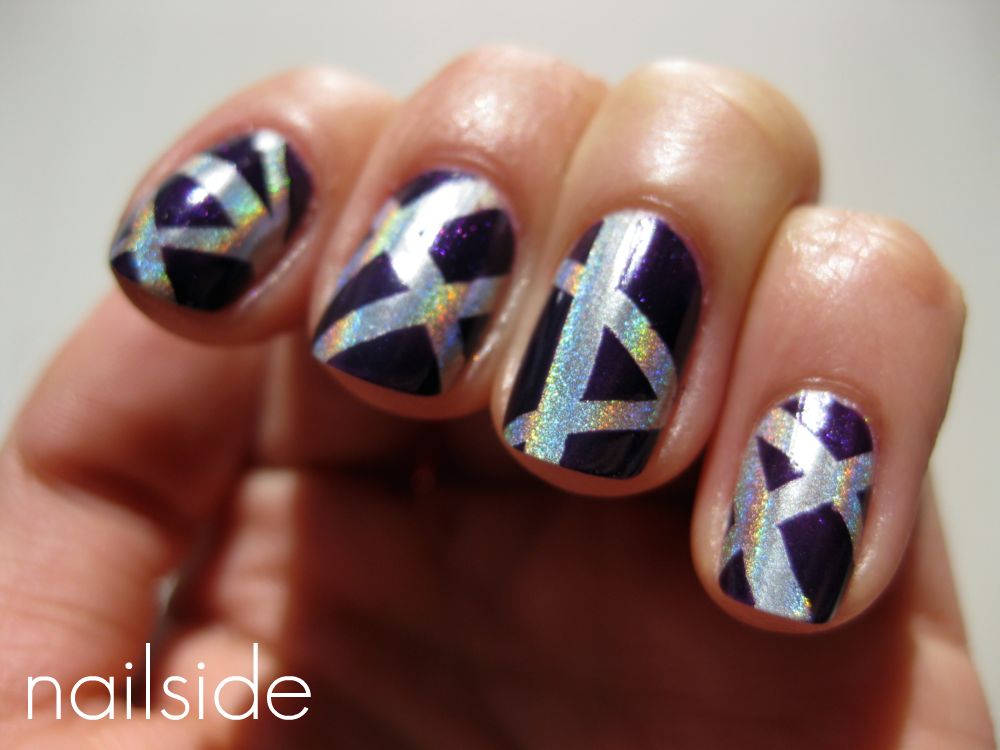
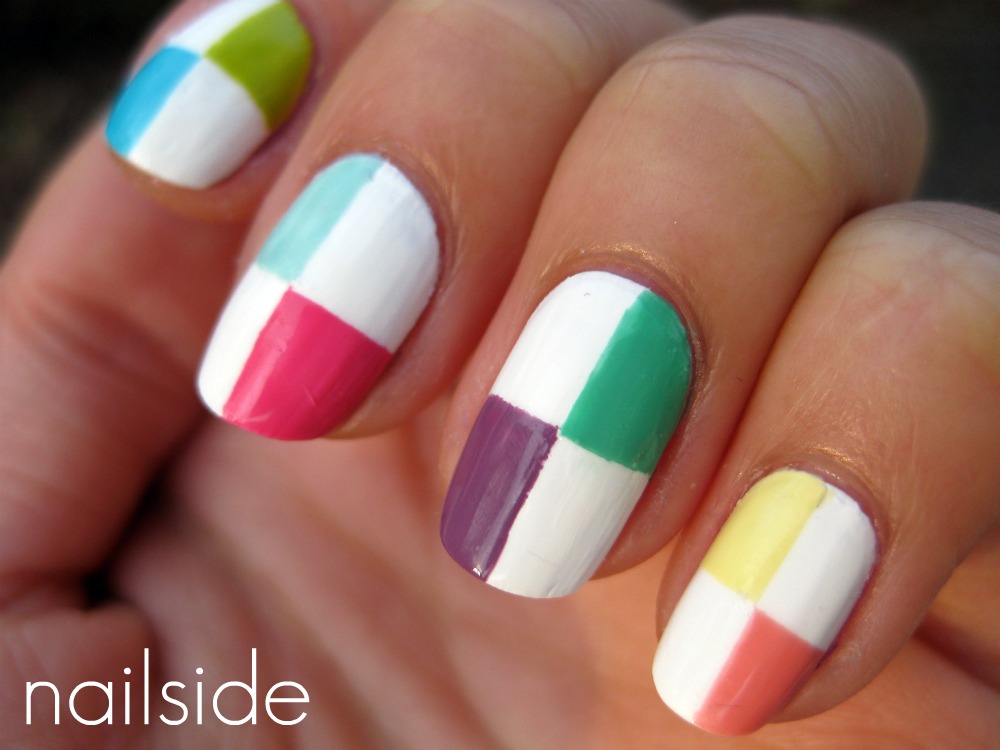
Hi guys, for this post I have a new tape mani to show you. It's a doubled crosspattern which creates a preppy plaid-pattern. The colors I used are Catrice London's Weather Forecast and a classic red creme, also from Catrice from the discontinued Nail Couture collection.

I absolutely love the preppiness of this look. You can go for a bold look with combining two bright, contrasting colors, or create something more sophisticated with different shades of greys or taupes.
For this pattern I've used four thin tape strips on each nail. If you want to recreate this look, try to keep your tape strips as even as possible for a tidy result. And when placing the strips, start with the first two in the same direction, and the second two in the other. Because of this it's easy to remember the order in which you've placed them which is useful for the removal afterwards. One last tip: don't make your strips too short or you won't have anything to grab on when removing them, about 1 inch/2,5 cm is fine. And if you've never worked with tape before it might be useful to take a look at my tutorial first, click here to see it.

Hope you like it and thank you for reading!

Color Club - Almost Famous


I know it just turned spring, but sometimes, all you need to get in a real summer mood is a nice and bright yellow. This is three coats of Color Club Almost Famous on a white base (Essence Stamp Me! White). It's so intense yellow! And makes me want to put on my sunglasses, kick back in the backyard with a cold drink and just enjoy the weather. Also the blue background reminds me of a pool :)

What are your thoughts on yellow polishes?

Block party


Hey everyone! For today's post I have a new kind of tape mani to show you. I used China Glaze Four Leaf Clover as my base color and added a coat of Seche Vite to speed up the drying time. After it was dry I placed thin tape strips to create the black block pattern. I really love the final result, it's very graphical and so simple. This mani is easy to recreate, and if you don't have much patience you can just cut it down to one or two accent nails which is still nice to look at. Another good thing about tape manis in general is that you don't necessarily need your dominant hand to make them, because the tape's already taking care of the neatness. That's one thing less to worry about :) Hope you guys are also having really sunny weather today like here in Holland, going for a walk now, bye!

Union Jack


Hi guys, for this post a blue mani with Union Jack accent nail! I came up with this look about a year ago, when I started dreaming of my own nailblog but didn't have the courage yet to go through with it. My first attempt was freehanded with my tiny paintbrush and the result was okay. But now that I've discovered the tape technique I wanted to do this mani again with tape, hoping for a neater result. But no... I've put a lot of time and effort in this little accent nubbin, it was a real pain in the ass and the final result isn't even that better than when freehanded. I stopped using tape after I'd done the flag's white parts, the red is drawn again, as you can see my lines are still a bit wobbly. But next time I might as well freehand the whole from the beginning, because with cutting and placing the tape, plus drying time, using the tape technique takes a lot more time then freehanding.

The blue base color is Barry M's Cobalt Blue, a nice, vibrant two-coater. The white is - as always - Essence Stamp Me! White, the red is from Catrice and also the one I used for the Mickey accent nail-mani. Though this design takes a lot of time to make, I do think it's worth it, and you only have to do one nail (or two) anyway, so why not.

If you guys want to recreate this look and might need some help, feel free to let me know if you want me to make a tutorial. Good night!

Vintage green


Hello dear readers, today I want to show you a vintage green version of the Ménage à trois mani that I did a week ago. I love all muted, dusty colors, specially when they're blue/green, so this mani is a favorite. Another thing I like about this look is the ton-sur-ton thing that's going on. (Meaning a combination of two or more shades of the same hue.) Polishes I used: first up is a polish from Catrice's Ultimate Nail Lacquer collection named Sold Out forever, which is supposed to be the Chanel Jade of the collection. It's a beautiful light, dusty green with a subtle green shimmer. The green in the middle is I Sea You from the same collection, it's such a gorgeous color! It's one of my favorites all time, a color that I think everybody should own and the price is really nice too: €2,49 for 10 ml/0.34 fl.oz. And it matches so nicely with Sold Out Forever! Last but not least is L.A. Girl's Matte Alpine Green, which is obviously matte, but that finish wouldn't fit in with the rest so that turned all nice and glossy after the topcoat :)

So which one's your favorite? The original below or this version?

Pink!

"Oh, the cow in the meadow goes moo... "


What I was thinking? I don't know, I just felt the urge to do a cow pattern on my nails today. And besides, leopard print has to pass the torch someday... Lol. And when the hell to wear to this mani? Also don't know, maybe on a sunny day during a visit to the Ben&Jerry's? What I do know is that since making this mani I can't get Phoebe's song about barnyard animals out of my head...

Oh, the cow in the meadow goes moo,
Oh, the cow in the meadow goes moo.
Then the farmer hits him on the head and grinds him up,
And that's how we get hamburgers...

Anyway, polishes I used are Essence Stamp Me! White - two coats - and some nameless black cream for the spots which are drawn with a little paintbrush.
Craving ice-cream now... See ya!

Neon crackle party


Hi everyone! My first crackle mani! The first time I saw the effect of crackle polish I absolutely hated it, I thought it looked disgusting and swore I'd never ever be seen with it! Guess I have to take a few words back, lol. 'Cause I kind of like it, not loving it but without a doubt liking it. In black it has something similar to the leopard print and it looks gorgeous on neons, so that's what I did for this mani. Most of the time neons are very sheer and even reveal VNL after many layers of polish. That's why I always use a white base underneath which gives an opaque finish but also makes the colors so bright that it looks like they're glowing. But being so sheer also gives a funny side effect: you can layer them just like highlight markers which leads to new colors. For the mani I used Color Club's Warhol, Almost Famous and Chelsea Girl, a pink, yellow and blue neon. Caused by the layering you can also see some purple and orange. (Had I used blue and yellow next to each other more often, there also would've been some green.) There's a whole rainbow yet to be discovered! So I'll definitely be experimenting more with layering neons. Oh and by the way, the black crackle I used is from Barry M Nail Effects :)

How are you guys thinking about crackle? Absolutely hating it, totally loving it or starting to?

Hello Kitty!


Hi guys! Wow, I can't believe I already have over 100 followers! Thank you to each and every one of you for taking the time to read this blog and leave comments. I'm so glad that you're enjoying and inspired by my designs, because that's what this blog was created for. To the mani then!

So this time I decided to do a Hello Kitty mani, I had just received my free Hello Kitty imageplate from Born Pretty and couldn't wait to play with it. I used the imageplate on my ring finger which was already covered in two coats of Essence Stamp Me! White, after that I just filled in the bow and her nose with a tiny paintbrush. The rest of my fingers all have a different cute design, which - combined - create a playful look. The base color is a warm baby pink from Hema, unfornately I don't have the number anymore but I do think it's still available. On my thumb you can see two little flowers, they're stickers I once bought in Hong Kong and though they're not meant for nails they stick pretty wel on the surface. On my index finger I painted the Hello Kitty bow with (how appropriate!) Kitty Queen from H&M's Hello Kitty cosmetics collection and a black creme. My middle finger is done with even sized tape strips and the red is 022 from DA, a local drugstore. And finally I used Konad's M79 on my pinky, 'cause polkadots and Hello Kitty are BFF's for life :)

Thanks for reading and take care!

Hello Kitty imageplate from Born Pretty

Cute flower stickers!

Red polkadot + Mickey accent nail


Hello everyone! I was in a cute mood when I did this mani and the polkadot pattern is a great way to achieve cuteness! I used Konad imageplate M79 and China Glaze Millenium on top of a classic red creme from Catrice. (Don't know the name or number, I pealed off the sticker back in the days when I didn't know that could be useful... )

I wasn't aiming for the Minnie Mouse-look doing this mani (maybe more of a pin-up look), that's why I used silver and not white. But how can you not think of her seeing this classic pattern. So I drew a little Mickey(!)-symbol on my ring finger. Now why Mickey are you wondering? Because he's more recognizable :)

Speaking of cute, I've got another cute mani planned for this week, with someone who's a recurring character on this blog...

See ya :)

Mickey!

Cold as ice


Good afternoon! For today I have a blue tape mani for you. This was kind of an experiment, I was curious about how the tape pattern I had in mind would turn out.

The lighter blue you see is For Audrey, a China Glaze must-have. The color I used for the bars is a Hello Kitty polish from H&M named Turquoise Kitty, which again comes in a very cute bottle like other Hello Kitty polishes. The formula however really sucked, it was very thick and streaky, but Mr. Thinner fixed that for me :) Finally I mattified it with Essence Matt topcoat.

I'm not completely sure if I like this mani, maybe I should've left it shiny. I do think the tape pattern looks interesting, so I'll probably use it again in the future with more contrasting colors.

What's your opinion on this mani?

H&M Turquoise Kitty

California Gurls


Not that the Katy Perry song was my inspiration, but looking through the pictures of the finished mani did remind me of the song and this look would fit pretty well in the music video too, lol.
For the mani I used 3 coats of Strawberry Fields and a coat of Seche Vite to speed up the drying process. After that I applied my tape strips, added a coat of Essence Stamp Me! White and right after that Color Club's Almost Famous. The white base underneath the yellow gives an opaque finish and makes the yellow pop. The yellow should be applied almost immediately after the white so that none of both polishes are dry and stuck to the tape once you remove it. As a finishing touch I placed a green holographic star on my middle finger. Now let the summer begin!

Holographic laser mani


Hi guys, right now you're looking at a new version of my laser mani. Holographic polishes are just perfect for tape manis. Though they don't always cover in one coat, they sure dry fast. The one I used is Gosh Holographic, it was opaque in two coats and ready to be taped in approximately 5 minutes. On top I used a beautiful purple shimmer from Art de Lautrec, #34 which is a lot less blue in real life. Unfortunately the shimmer isn't visible on the pictures and I didn't use topcoat because that would take away the holographic finish.

I'm loving the final look, holographic polishes are such an easy way to make the whole more interesting, so definitely recommended (for tape manis).

Have a nice day!

Ménage à trois


Hi everyone, there isn't much to say about this mani, I just loved the three colors together :) I started with 2 coats of Rimmel Velvet Rose, then I freehanded the two other colors which are China Glaze Designer Satin and Color Club Gossip Column, my fave petrol.

If you like this mani, it's definitely worth trying yourself, it's easy and fun to do :)

Thanks for reading and take care, y'all!

Green funky French


Hello dear readers, for this post I have a green funky French for you. It's a fresh and happy mani which makes me want it to be summer even more... The stripes are made with tape, Essence Check Me Out and H&M's Moody Model, which is a slightly greener version of Color Club's Gossip Column. If you want to do a tape mani yourself, click here to see my tape mani tutorial if you've missed it.

Thanks for reading :)

Moroccan French?


This mani's called Moroccan French because it kind of reminded me of Moroccan tea cups, with the bright colors and metallic accents. But you could call it the Easter eggs mani too, or a weird French... Whatever :)

The silver is China Glaze's Millennium, the pink is Ultimate Pink from Essence and Cobalt Blue is from Barry M. I've been using last two colors a lot lately, they cover very well and the colors are so vivid.

Actually, I don't know what to think of this mani. It started with just the silver stripes and blue tips, but that didn't really work out the way I wanted so I added the dots and apparently I seem to think it's Moroccan now...

So I'm curious about what your thoughts on this one are, yay or nay...?

Black and White tape mani


Black and white, a classic color combination that never bores me.
I had the idea for this tape pattern for a while. With my first attempt to create the mani, the tape strips were too big so it resulted in the Bluesy checkers mani, while it should have been the Bluesy STRIPES mani, you see. So now you're looking at my second attempt, in a black and white combo. But I'll put this mani under the label 'Checkers' as well, 'cause to some people it probably still looks like checkers, lol.

Polishes I used are Essence Stamp Me! White and a nameless black creme. The matte topcoat is also Essence's.

Are you a fan of black and white as well? Good night!

Tutorial: laser design tape mani


This blog was made to share nail designs, so today I want to show you how I make a laser tape mani with one layering color. Continue reading »

Katy Perry mani

Yesterday I went to the Katy Perry concert in Amsterdam, which was awesome and so in the style of KP. The air was filled with a sweet candy scent, the stage was turned into a colorful (cotton) candyland and her outfits were an explosion of color and LOTS of glitter. I even caught myself fantasizing about having her glitteroutfits on my nails, lol. I actually am a huge glitter lover, though you wouldn't say so with not having done a single glittermani so far. But I will, promise :) To the mani!

For the concert I already knew what outfit I wanted to wear, it was a creme white tube dress with different colored hearts from Miss Selfridge (see last picture). I wanted a stunning mani to match the dress so I chose for a tape mani in the sort of same colors as the dress, and this is what I came up with:


Polishes I used: the grey is from Miss Sporty, the dark purple from Hema and the blue and pink named Turquoise Kitty and Kitty Queen are both from H&M. Kitty Queen is also the pink I used for the Extravagant checkers. The white base color is Essence's Stamp me! White.

Dress from Miss Selfridge

Thanks for stopping by!

Spotlights mani


The other day I had a 'laserbeams'-mani, today I have a metallic version but with gold 'beams'. So I asked my boyfriend what he would call this look and he came up with: the spotlights mani! And I can't think of anything better than that, it really does look like golden spotlights beaming through a bright blue night sky.

This is another tape mani, I think it will take a long, long time before those will bore me, lol. The gold you see is China Glaze 2030, my favorite gold next to Midnight Kiss. 2030 is perfect for tape manis like this one, because it's opaque in one coat and it dries so fast! That means you only have to wait 2-3 minutes before you can place the tape on top. The blue is a namesless polish from a brand called KBY,  this is also the blue I used for the futuristic French. Because I like the not so glossy finish of the metallics, I didn't use topcoat.

I'm really digging these tape manis, they're so simple, fun enough for a party and if using one-coaters (which usually are fast drying), shouldn't take that much longer than a regular mani. So if you like this look, you should definitely try it sometime :) That's all, folks!

Bluesy checkers


Hello readers! I really wanted to show you this gorgeous blue foil from Hema, a Dutch department store. It's such a beautiful polish and I've never seen anything like it. Even though the color is perfect one its own, I couldn't stick to just one color. So I taped it and added China Glaze Calypso Blue. Calypso Blue is a very dark navy, I love the color but unfortunately it stains very bad which keeps me from using it as often as I would like to. But since I already used another polish underneath, it will be fine.

There isn't much else to say about this mani, I'll just let the picture do the talking :)

Zigzag tape mani


Hi everyone! Today's a look with zigzag pattern, I wanted to try something new with tape. Also my nails were a bit shorter than usual so I was looking for a vertical pattern to make them look longer. And that's how the zigzag tape mani was born. Though this design might look a bit complicated, it actually looks a lot harder to make than it really is.

First I applied a red creme from DA, a local drugstore. After it dried I placed triangles cut out from tape on my nails. On top went Barry M's Cobalt Blue and then Matt topcoat from Essence. Now here's what makes this look easy to achieve: cutting the triangles doesn't need a lot of precision, it's okay when some are smaller or larger than others, different sized wedges make the design playful. And because the tape's placed at the beginning of the nail, you polish away from the tape which reduces the chance of 'bleeding'. This look is all about the pattern so I used a matte topcoat instead of a glossy one to bring out the design better.

Thank you for reading :)

Laser mani


Laserbeams! That was the first thing that crossed my mind after I removed my tape and saw the pink lines cutting into the blue. This mani looks very '80s with the abstract pattern and the bold colors. The pictures aren't very color accurate though. Both colors are much brighter in real life, especially the neon pink is a lot pinker, like a highlight marker.

I was satisfied with the blue and pink, but the glossy finish of the topcoat really just distracted from the whole laser-look. So I mattified it with Essence Matt topcoat, which I think brings out the cross patterns much better. The pink neon is Warhol from Color Club, the blue is Essence's Caribbean Sea from the Show Your Feet-collection. Caribbean Sea is a nice aqua blue shimmer and it covers in one or two coats, but it stains so, so bad... Don't forget that basecoat, folks!

Thanks for reading :)

Japanese flowers


Hello dear readers, when I saw pictures of the yellow/green Japanese mani at Another Bottle of Polish, I knew I had to try it myself. The flower design was done so neatly, it was just perfect. So thank you to ABOP for the inspiration for this mani.

The background color is Catrice's I Sea You, a beautiful dusty turquoise. I picked H&M's Moody Model and a regular black creme for the flowers. To add a bit of spice I layered Galaxy Girl (Orly) over the black. Now I have to say this mani was a LOT more work than my usual (tape) manis, but it was going to be worth it. But after I had finished the flower design like was done at ABOP, it was just still missing something. It didn't stun me like my inspiration mani did, my nails looked so blank. That's why I drew gold lines around the flowers to fill up the gaps, also it looked more oriental now. As a finishing touch I also dotted the centers of the flowers with gold, the polish I used for this is China Glaze 2030. And now I actually like the result, it reminds of origami paper. Thanks for your time!

Extravagant checkers


Another checkered mani inspired by Erika from Chloe's Nails! I just can't get enough of them, I still have so many color/finish combinations I want to try out.

For this mani I used two lovely polishes: OPI's Extravagance and a Hello Kitty polish from H&M named Kitty Queen. I placed a close-up of the Hello Kitty polish so you can see the cute bottle and that pretty silver shimmer, look at it! It makes the pink so shiny :)

What are your thoughts on this pink mani?

Return of the silver accent French


Remember the silver accent mani? It was dying for a party, so I changed the look to a taped crosspattern. I wanted the look to be more colorful but in a mysterious way. The final result is very graphical and has something spacy. The crosspattern is different on each nail, I just placed the tape strips in random cross shapes, changing the angular degree a bit everytime. Then I added three colors to the black that already had the silver stripes on the tips. The extra polishes I used are China Glaze's Midnight Kiss, a dark silver foil from Hema and Orly's Galaxy Girl, one of the prettiest polishes ever! Galaxy Girl really adds a new dimension to the whole with its changing finish, sometimes it looks purple/pink and then it's turquoise again. It doesn't show very well on the pictures though, but it's there in real life. It's there!

Have a great day :)

From left to right: Hema, China Glaze Millenium and Midnight Kiss, Orly Galaxy Girl

Silver accent French


Hi, everyone. For now just a simple, but still other than others French mani. I'm not even sure if this look still counts as a French, though. But hey, it's my blog :)

I used a regular black creme for the base color and than I added the silver stripes using tape and then China Glaze's Millenium, my fave silver. I usually do it the other way round, so the silver first. That way you just need one strip of tape on each nail to create your stripe, instead of two. But when I figured that out I'd already applied the black, lol.

I like the overall look, it's really simple and still stands out. But I think I'll upgrade this mani to a more over-the-top-look. My clothing style isn't over the top at all though, it's just my nails where I allow it to be a party everyday :) So this mani will be back... ;)

Thanks for reading!

Colorful checkers


Hello readers, I've been using a lot of dark colors lately, so I really felt like doing something lighter and happier now that spring is about to arrive. So here's a checkered mani, inspired by the talented Erika from Chloe's Nails, with eight different colors on a white base. The white I used is my absolute favorite so far, it's Stamp me! White from Essence. Because it's made for stamping, it's so pigmented! And the fast drying process is a big plus, but that's also why you have to apply it very quickly or you'll end up with brush strokes. But if you can apply it rapidly but neat, you can easily get away with one coat only. I did two.

I love the final result, it's so colorful and great for Easter. But I actually came up with this look accidentally, I'd planned on doing each nail the same, using two or three layering colors, but as I was doing my pinky I realized that I really needed some color. So now you're looking at the solution to that :)

Thank you for your time!

From left to right:
Hema - #81
Essence - Lime Up!
Essence - The World's Coolest
Miss Sporty - #140
Color Club - Uptown Girl
Hema - #82
Rimmel - #058 Lemon Drop
Hema -  no name

Purple stars


Good afternoon everybody! For this post I want to show you a purple mani for which I used Color Club's Uptown Girl and Wild at Heart. Though I'm not a huge fan of purples I knew I wanted to have the purple holo Wild at Heart the moment I saw pictures of it. 'Cause holo's I like :) And this holo covers very well, which is nice for the freehand nail art I did here. Now this does not count for Uptown Girl that I had to apply three coats of for complete opacity, but the formula is nice and the drying time okay so it wasn't that bad.

For the stars I used a tiny, tiny paintingbrush, I kind of painted them randomly on the nails. Then I used a dotting tool from Essence to fill up the gaps between the stars.
So what do you think of purples? And would you like to see more purple manis in the future?

Uptown Girl and Wild at Heart